 Webmail
 Dynamic Mail
Messages
Checking for, writing, responding to, and deleting messages are simple jobs every mail system can do, and it's important that you master these skills in order for your email experience to be enjoyable. Don't worry. The new webmail makes these jobs a breeze.
Checking your Messages
After logging in, you'll be taken directly to your Inbox:
Any new messages will be displayed, as well as the messages you left in your Inbox when you last signed in. To check for new messages, you can refresh the page with your browser, or you can click the ![]() icon in the upper-left of the Inbox. Also, the page is set to refresh itself every few minutes.
icon in the upper-left of the Inbox. Also, the page is set to refresh itself every few minutes.
Writing a New Message
There are two ways to start a new message. In the Inbox, the Button Area has a New Message button. Also, in the Tree Area, if you have the Mail option expanded, you’ll see a New Message link there. Both options will have a ![]() icon with them. Clicking either one brings up the New Message window:
icon with them. Clicking either one brings up the New Message window:

Basic Messages
For a basic message, you’ll want to fill in the email address of the person you’re sending the message To, the Subject of the message, and the Text of the message itself.
The Cc textbox stands for Carbon Copy. Putting an email address in this textbox will send a copy of the message to another person. The email address you put in the To textbox will be able to see you sent a copy to the other person, as well as see the other person's email address. The Bcc textbox stands for Blind Carbon Copy. It also will send a copy of the message to another person, but the email address you put in the To textbox will NOT be able to see you sent a copy to the other person.
Adding Contacts from the Address Book
You can use the Address Book button with the ![]() icon to add contacts you want to send the message to:
icon to add contacts you want to send the message to:
Select which contacts you want to add with the list on the left. Then click the To button. This will add the contacts to the list on the right. You can do the same with the Cc and Bcc buttons. If you make a mistake and add someone you didn't mean to, select that person on the list on the right, and click the Delete button underneath. Once you are finished adding contacts, click the OK button. This will take you back to the New Message window, and you'll see those contacts added to the textboxes you chose.
You may or may not have contacts in your Address Book to add. If you used our old webmail system and had contacts there, they should show up here. But if this is your first time using our webmail at all, then you probably won't have contacts listed. Adding contacts is covered in the Address Book section of this guide.
Spell Checking
If you're worried about your spelling, you can click the Check Spelling button with the ![]() icon. Doing so will freeze the text you've written, and change the Check Spelling button to a Resume Editing button. It will also make the words it finds misspelled red and underlined. Once you've found which words are misspelled, you can click on the word for a list of suggestions that may be the word you're looking for. If you find a suggestion that is correct, clicking on it will replace the misspelled word with the correct word, and the word will now be green and underlined.
icon. Doing so will freeze the text you've written, and change the Check Spelling button to a Resume Editing button. It will also make the words it finds misspelled red and underlined. Once you've found which words are misspelled, you can click on the word for a list of suggestions that may be the word you're looking for. If you find a suggestion that is correct, clicking on it will replace the misspelled word with the correct word, and the word will now be green and underlined.
A word is considered misspelled if it is not found in our dictionary. If you are using a complicated or rarely used word, it may not be in our dictionary, and could be considered "misspelled". However, if you are sure it is spelled correctly, don't change the word and don't worry about what the spell checker says about that word. Also, for complicated or rare words that you're not sure about, you may not find a correct suggestion in the list that is offered. If you are ever in this situation, it might be best to consult another source.
When you are finished correcting your spelling, click the Resume Editing button to unfreeze your text and continue composing your message.
Special Characters
If you need to enter special characters, such as a vowel with an accent, you can use the Special Characters button with the ![]() icon. Clicking this will bring up a new window where you can select all the special characters you need:
icon. Clicking this will bring up a new window where you can select all the special characters you need:
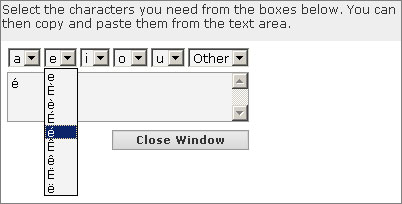
Clicking an entry in the drop-down lists will automatically put that character in the textbox below. Once you have the characters you want in that textbox, you need to copy and paste them into your message. In the textbox, click and drag with your mouse, selecting the characters you want. Then either right-click the selected characters, and click Copy, or hit Ctrl+C on your keyboard. Now close the Special Characters window, and go back to the New Message window. Then either right-click where you want to put the characters, and click Paste, or left-click where you want to put the characters, and hit Ctrl+V on your keyboard.
Attachments
The Attachment area at the bottom of the New Message window is where you can add attachments, such as pictures or documents, to send to a person. To attach a file, click the Browse button, and browse to the file you wish to attach. After you have done this, the Attachment area will change:
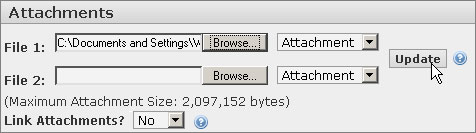
You'll have another blank entry to add another file. Everytime you add a file, a new blank entry will appear. Once you have finished adding the entries, click the Update button to upload the files to your message and attach them.
HTML Composition
If you want to add formatting to your message (such as different text sizes and colors) you can use the built-in HTML editor. By clicking the Switch to HTML composition link just above the text of the message, you'll see the following menu bar appear in the area where you type your message:

There are two views in the HTML editor: WYSIWYG (What You See Is What You Get), and Source Code. The WYSIWYG editor is the default and will probably feel familiar to anyone who has used a basic word processing program (such as Microsoft Word). It gives you many options to change the style and positioning of your text, add lists and special characters, and many other features. If you know how to code in HTML, you can click the ![]() icon in the bottom row of the menu bar to switch to the Source Code view and enter the HTML manually.
icon in the bottom row of the menu bar to switch to the Source Code view and enter the HTML manually.
Saving a Draft
If you've written part of a message, but can't finish it and need to come back to it later, you can click the Save Draft button. This will save a copy of the message into the Drafts folder. To start composing the message again, go to the Drafts folder, and click the Subject of the message you saved. To get to the drafts folder, in the Tree Area, make sure the Mail option is expanded, and click the Drafts link.
Sending the Message
Once you’ve finished composing your message, simply click the Send Message button, and it will be sent to your recipient.
Selecting Messages
All of the tasks you can do to a message (like forwarding and deleting) can be done either by opening each individual message and performing the task, or by selecting multiple messages from the Inbox and then performing the task. The second option can save a lot of time since you can do the same task to more than one message at a time.
To select a single message, simply put a checkmark in the checkbox before it. To select multiple messages, put a checkmark in the checkbox for each message you want to select.
In the upper-left corner is also a Select drop-down list with several options. The options you’ll use the most are "All", "None", and "Invert". By clicking the Select drop-down list, and clicking "All", you will select all the messages on the screen. By clicking "None", you will de-select all the messages. By clicking "Invert", you will select all the messages that you did not select before, and you will de-select all the messages that you did select before.
Above all the checkboxes in front of your messages, you'll see another checkbox. Putting a checkmark in this checkbox is another way to select all the messages. Removing a checkmark from this checkbox will de-select all the messages.
Reading a Message
From the Inbox, if you click on the Subject of a message, it will show you what the message says:
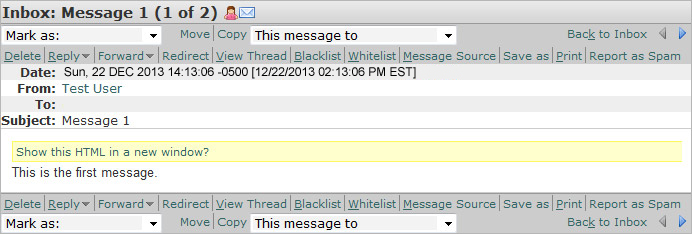
You can also view multiple messages at a time. From the Inbox, select which messages you want to view. Then, in the upper-left corner, click View Messages. A page will come up, similar to the one above, with the Subjects of each message at the top, and the content of each message underneath. To view a single message, you can click on its Subject at the top, or click the Go to Message link in the upper-right corner of the message.
Replying to a Message
While a single message is open, you can click Reply in the upper-left corner of the message. This will bring up a new window, similar to the New Message window, with the To and Subject boxes filled out for you automatically, as well as a copy of the message in the Text area. All you have to do is write the message you want to reply with, and add attachments you may want to add. Once you’ve finished writing the message, click the Send Message button.
Forwarding a Message
Forwarding a message copies a message you've received as an attachment and lets you send it to another person. There are two ways to forward a message: from inside the message itself, or from the Inbox. While the message is open, you can click Forward in the upper-left corner of the message. From the Inbox, you can select which message(s) you want to forward, and then click Forward in the upper-left corner of the Inbox. Using the second method lets you forward more than one message at a time.
Whichever method you use, once you click Forward, a new window (similar to the New Message window) will come up with the previous message(s) already attached. You’ll have to fill in the email address of who you’re sending it to. You can also write a message to them here. Once you’ve finished filling everything out, click the Send Message button.
Deleting a Message
Once you are finished with a message, you’ll want to delete it to keep your mailbox from getting cluttered. There are two ways to delete a message: from inside the message itself, or from the Inbox. While the message is open, you can click Delete in the upper left corner of the message. From the Inbox, you can select which message(s) you want to delete, and then click Delete in the upper-left corner of the Inbox. Using the second method lets you delete more than one message at a time.
Checkpoint: Make sure you understand how to do all of these steps because they are vital to your email experience.
Checkpoint: So far, this guide has explained how to use webmail for basic emailing. If this is all you want to do, then you can stop here. If you want to know more about the other features available, please continue reading.
Back to Mail