 Webmail
 Dynamic Mail
Address Book
The Address Book is a common tool for many email systems that lets you keep track of your contacts. To get to the Address Book, click the ![]() Address Book link in the side menu. You’ll be brought to a search page. This can be useful if you’re looking for someone but have too many contacts to look through. For now, we’ll ignore the search area because you may not have any contacts in your address book at the moment to search for.
Address Book link in the side menu. You’ll be brought to a search page. This can be useful if you’re looking for someone but have too many contacts to look through. For now, we’ll ignore the search area because you may not have any contacts in your address book at the moment to search for.
Adding a Contact
To create a contact, we need to get to the Add Contact page. To do this, click the ![]() New Contact button at the top. The Add Contact page will come up:
New Contact button at the top. The Add Contact page will come up:
The Address Book can keep track of a wealth of information, which is divided into five categories: Personal, Location, Communications, Organization, Other. To edit each category, click through the tabs at the top. Once you've entered all the information, click the Add button. You'll see the following page, with a confirmation that the contact was added:
If any of the information is incorrect, you can click the Edit tab above the information. You’ll see almost the exact same screen as when you added the information, but with a Save button at the bottom, instead of an Add button. If you decide that you don’t need this contact anymore, you can click the Delete tab. You’ll be asked if you want to "Permanently delete this contact?". If you’re sure, click the Delete button.
Viewing Contacts
To view contacts that you’ve added, click on the ![]() Browse button at the top. This will bring up your Address Book:
Browse button at the top. This will bring up your Address Book:
To view information about a contact, simply click the name of the contact.
Editing Contacts
Sometimes you might have to change the information for a contact. Maybe they have a new email address, or they moved and you want to update their Home Address. There are two ways to edit a contact: From the contact’s page itself, and from the Address Book. To edit from the contact’s page, click on the name (ex: John Doe), and then click the Edit tab at the top. To edit from the Address Book, select the contact and click the Edit link in the upper-left corner. A page similar to the Add Contact page will come up, but with a Save button, instead of an Add button.
Searching for Contacts
Once you've added all of your contacts, you might find it difficult to find a specific contact in your address book if you have a lot of contacts. Although the Address Book sorts your contacts alphabetically, if you have a large number of contacts then sifting through page after page may be cumbersome. We have kept this in mind and offer a Search feature to help you find your contacts more easily.
In the Side Panel, make sure Organizing is expanded and click on Address Book. This will take you to the Search feature. The Basic Search will come up by default:
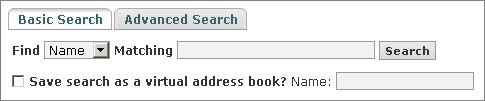
This allows you to search your entire Address Book for a certain Name or Email Address. If you wish to enter more detailed information, you can click on Advanced Search. Once you have entered the information, click the Search button. The contacts that match your Search description will be listed underneath the search area.
Virtual Address Books
You may notice the "Save search as virtual address book?" option on the Search page. This option lets you save the search results, and puts them into a seperate Address Book, which you can name based on the criteria you searched for.
For example, you may want to make a Virtual Address Book for people from Work. You can do an Advanced Search and type in the name of the Company you work for. Then put a checkmark in "Save search as virtual address book?" and enter "Work" as the Name for the virtual address book. This will add all of the contacts who work at that same company into a seperate Address Book called "Work".
Please be aware that Virtual Address Books are not really seperate. The contacts in them are tied to the actual Address Book(s) from which you added the contacts from. Think of the contacts in a Virtual Address Book as snapshots of the contacts in the real Address Book. The consequence of this is that you can NOT edit or delete the contacts from the Virtual Address Book. You'll still have to do that from the original Address Book.
To view the contacts in a Virtual Address Book after it has been created, click the ![]() Browse button at the top. To the right of the buttons at the top, you may notice a new drop-down list. This list is the list of your Address Books. To view the contacts in the "Work" Address Book (or whatever you may have decided to create), simply drop-down the list and select it.
Browse button at the top. To the right of the buttons at the top, you may notice a new drop-down list. This list is the list of your Address Books. To view the contacts in the "Work" Address Book (or whatever you may have decided to create), simply drop-down the list and select it.
In the future, you may need to make changes to a Virtual Address Book. To do this, click the ![]() My Address Books button at thhe top. Your Address Books will be listed:
My Address Books button at thhe top. Your Address Books will be listed:
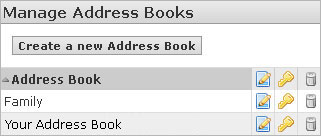
To the right of the name of the Address Book, there are ![]() Edit,
Edit, ![]() Change Permission, and
Change Permission, and ![]() Delete icons. The
Delete icons. The ![]() Edit icon allows you to change the name of the Address Book, as well as enter a description for it. The
Edit icon allows you to change the name of the Address Book, as well as enter a description for it. The ![]() Change Permission icon allows you to edit who can see, read, edit, and delete contacts in your Address Book, and the
Change Permission icon allows you to edit who can see, read, edit, and delete contacts in your Address Book, and the ![]() Delete icon allows you to delete the Address Book.
Delete icon allows you to delete the Address Book.
Multiple Address Books
Aside from Virtual Address Books, you can also create independent Address Books that are not just snapshots of your default Address Book. You may want to do this to create seperate Address Books for your Family, Friends, and Co-workers.
To create a new Address Book, click the My Address Books button with the ![]() icon in the Button Area. Then click the Create a New Address Book button. The following screen will come up:
icon in the Button Area. Then click the Create a New Address Book button. The following screen will come up:
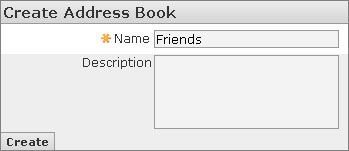
Type the name of the Address Book (for example: "Friends"), and a description of the Address Book for future reference. Then click the Create button. A confirmation will tell you the Address Book has been created and you'll now see it in the list of your Address Books:
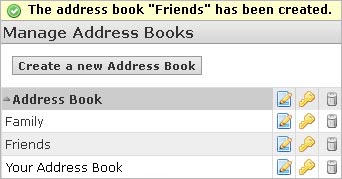
You can manage contacts in this new Address Book just as you did in your default Address Book
Moving/Copying Contacts Between Address Books
You may need to move or copy contacts from one Address Book to another. One reason for this might be that you added all of your contacts with one address book, but now you have so many contacts that you want to get them more organized. To move a contact from one Address Book to another, click the Browse button in the Button Area, and make sure you're looking at the Address Book that has the contact you want to move.
Select which contact(s) you want to move by putting a checkmark in the checkbox beside their name(s). Then, in the to a different Address Book drop-down list above the contacts, select which Address Book you want to move the contact(s) to. Then click the Move link.
You'll see a message confirming that the contact was moved to the Address Book you selected. To copy a contact, rather than move it, follow the same steps, except at the end, click the Copy link instead of the Move link.
Contact Lists
Contact Lists are groups of contacts within an Address Book. These lists let you organize your contacts even further because you can use them to group contacts. For example, in a "Family" Address Book, you might have Contact Lists such as "Immediate Family", "Neices & Nephews", "Aunts, Uncles, & Cousins", etc.
To create a contact list, select the contacts in the Address Book you want to group by putting a checkmark in the checkbox beside their names. Then click the to a Contact List drop-down list, and select which Address Book you want to add the list to. Then click the Add link.

A prompt will come up asking you to "name the new contact list". Simply type a descriptive name for the list (for example: "Cousins" if you're adding the list to a Family Address Book), and click OK. You'll see a confirmation that the list was added, as well as how many contacts were added. If you added the list to the Address Book you were viewing, you'll also now see the list in the Address Book.
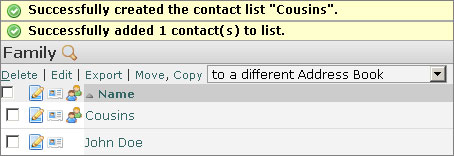
In an Address Book with Contact Lists, you can tell which are lists and which are contacts, based on the Group icon: ![]() . Items in the list with this icon are Contact Lists, and items in the list without this icon are regular Contacts.
. Items in the list with this icon are Contact Lists, and items in the list without this icon are regular Contacts.
Emailing People From Your Address Book
To send a message to a contact from your Address Book, first go to your Inbox and start a new message. If you move your mouse over the word To, you'll notice it is a link. Clicking in it brings up a window that lets you add contacts from your Address Books:
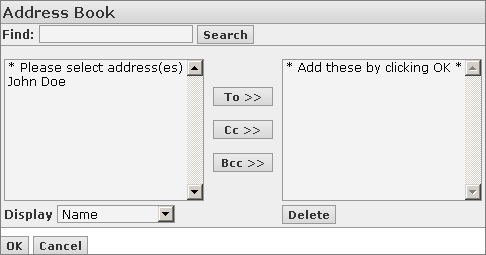
Click the contact on the left, click the To button in the middle, and it will be added to the list on the right. You can also do the same with the Cc and Bcc buttons. When you've finished adding all the contacts you want to message, then click the OK button. The contacts you chose for each section will be added to the message you started. If you have multiple address books, you can change which Address Book is loaded by selecting it from a drop-down list in the upper-right corner, and clicking the Search button.
You can also add Contact Lists this way. Adding a Contact List will send the message to every contact in that Contact List. This is how Contact Lists can help you save time when repeatedly sending out emails to the same group of people.