 Webmail
 Dynamic Mail
Fetch Mail
Along with checking your email here, the new webmail system also gives you the option of checking email that you may have with other email providers. You need to know if your other email provider supports POP3 or IMAP protocols. These are the only two protocols that are supported at the moment. Most Internet Service Providers support these protocols, but webmail systems such as Yahoo, Hotmail, etc. do not. If you're not sure if your other email provider supports these protocols, you'll want to contact them to find out.
Adding an Account
To setup another account, first click the ![]() Options link in the side menu. Then, in the Choose Application drop-down list in the upper-right corner, select the Mail option. Under the "Message Options" column in the middle, click the Fetch Mail link at the bottom. Then click the Edit your preferences for accessing other mail accounts link. Then click the Create a New Account button. A new page will ask you what the mail server type is. Click the Select the mail server type drop-down list, and select "IMAP/POP3 Mail Servers" option. You'll reach the setup page:
Options link in the side menu. Then, in the Choose Application drop-down list in the upper-right corner, select the Mail option. Under the "Message Options" column in the middle, click the Fetch Mail link at the bottom. Then click the Edit your preferences for accessing other mail accounts link. Then click the Create a New Account button. A new page will ask you what the mail server type is. Click the Select the mail server type drop-down list, and select "IMAP/POP3 Mail Servers" option. You'll reach the setup page:
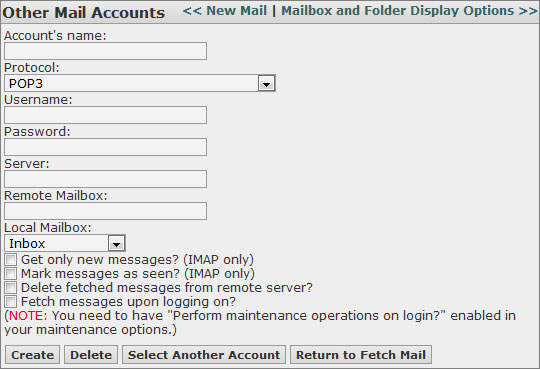
For Account's name, type a descriptive name for the mail account you're setting up, such as the name of the provider itself. This is useful to tell multiple accounts apart. For Protocol, Username, Password, and Remote Mailbox, you'll need to enter the information specific to your other provider. Again, if you're not sure about this information, you'll want to contact your other provider to find out.
Local Mailbox refers to which folder the messages from this mail account should be delivered. If you don't mind where it goes, just set it to the Inbox. However, if you'd still like to easily be able to tell which mail came from where, you might want to setup a seperate folder for this mail account, and set it to deliver the mail to that folder. If you're not sure how to make a new folder, look over the Folders section of this guide.
The first three checkboxes are asking what you want to do to the messages on other provider's server. The first two options require that the account you're setting up be an IMAP account. Checking the first checkbox will only bring in new messages from the other server, and checking the second checkbox will mark messages on the other server as seen once they've been brought over to our server. Checking the third checkbox will delete messages from the other server once they've been brought over to our server. The final checkbox you'll want to check. There is no way to fetch mail manually, so you want to set it up to do it automatically.
When you've finished entering all the information, click the Create button at the bottom.
Editing & Deleting an Account
If you change your password for an account and you need to update it in webmail, or you need to delete an account, you can do so by expanding the Options in the Tree Area, and clicking on Mail. Under the Message Options column, the last entry is Fetch Mail. Click this, and then click the Edit your preferences for accessing other mail accounts link. Click the Select an Account drop-down list, and pick the account you want to edit or delete. You'll see the same page as when we added the account, but with a Save button, instead of a Create button. If you want to edit the account, make the changes you need to make, and then click the Save button at the bottom. If you want to delete the account, click the Delete button at the bottom.